Monday, March 29, 2010

Magnolia Downunder Challenge #39 and Stamp Something Challenge

Hello again :oD This week at  "Magnolia Downunder" the
challenge is SEWING it can be real sewing/stitching or it
can be fake. I have been thinking about dragging out my
sewing machine for a while and I am so glad that this
challenge came along, or I may not have discovered
what a fantastic tool the sewing machine is...I think
I'm hooked!

I am really enjoying making, three-dimensional projects
at the moment, in particular, giftboxes and bags. So this
week, I have decided to make 'Favour Bag/Handbag',
which I think would be ideal for little girl's parties,
Weddings, or anything you like :oD

I am also entering this into Stamp Something 
Pink Somethings Challenge.


I added a small velcro sticky dot, so that the bag can be
opened and closed. I also wanted to show you the back of
the bag, because this paper it so pretty, it has a beautiful
leafy pattern that is glittery and glossy. I brought it quite
some time ago at a cheap craft store and I really wish
that I had brought lots more :o)

 
Stamps          60's Tilda and "yummy" by Stampin up
Flowers         Bizzy Becs
Card               Dusty pink cardstock
Other             Ribbon, clear plastic heart, pink pearls


Thankyou for looking, please feel free to leave a
comment, as comments are really appreciated :oD
Happy Stamping!
Peta

Sunday, March 28, 2010

Congratulations Kellie, 1 million blog hits Woo hoo!!!!!

The truly amazing Kellie Winnell is celebrating an amazing
1000 000 blog hits! Its not suprising, Kellie has been inspiring
us all with her awesome creations for quite some time. She also
brings us the fantastic challenges that we all love each week 
over at Magnolia Downunder and owns the wonderful
Magnolia Downunder store where alot of us buy our Gorgeous
stamps :oD

To celebrate this fantastic milestone, Kellie, along with
Christine at All That Scraps are offering one lucky person
the chance to win this totally awesome prize...

The Swiss Pixies Spring Kit
containing 8 Swiss Pixies, 6 accessory stamps and
3 Spring sentiments.

Copyright  All That Scraps


So why not head on over to Kellie's page here
and join in the fun, you never know you might be the wiiner
of this fantastic prize...I so want some of this yummy candy :oD
This awesome prize is open for entry until midnight on
23rd April 2010.  Good Luck :o)

Saturday, March 27, 2010

Just Magnolia Challenge week 48

Hello again, this is week 48 at "Just Magnolia" and they have a sketch as follows...
As it is almost Easter, I decided to keep the easter theme
going by making a little 'handbag' that I can later add
eggs to, so that I can add it to my little girl's easter hunt
next sunday :o)
I got the inspiration for this project, from page 57 of
issue #2 of  "Magnolia Ink" magazine.


I have adapted the sketch to fit my project...


Stamps     'Tilda cuddling bunny' and 'Easter wishes' from Daisy & Dandelion
Flowers     Gardenia/Cherry Blossoms/leaves - Magnolia Downunder store
others are from Bizzy Becs
Other    Pink and white cardstock, kaisercraft paper, Dazzling diamonds
glitter,  pearl string. sheer pink ribbon, gold brads, pink pearls.

Thankyou for looking and I hope everyone has a safe and happy Easter :oD
Happy Stamping
Peta

Inkspirations sketch challenge #20

Hi there,
I have just decided to join in the "Inkspirations sketch" challenge for the first time. I have been following Makeesha's website for quite some time and now that I have my own blog, I thought it might be fun to join in :oD

This week the sketch is as follows...


I decided to make an easter card, using a stamp that I
recently won (along with some other fantastic goodies),
while participatingin Magnolia Downunder's Blog hop,
in which they celebrated there 1st Birthday.
I won my prize from the fantastic 'Chantelle', who, I know is
also on theDT for Makeesha's wonderful Team. Thankyou
very much Chantelle, I am really loving this new stamp :o)

This is the cration that I came up with ( I did kind of turn the
sketch upside down, so I hope you don't mind :oD)...


Stamp      Tilda hugging bunny
Cardstock     Stampin up Chocolate Chip, Regal Rose and Pumpkin Pie
Papers     Stampin up DSP 'Sweet always'
Other     Flowers - Bizzy Becs, Dazzling Diamonds, kaisercraft border
  punch, argyle ribbon.

Thanks for stopping by, please feel free to leave a comment :oD
Peta

Wednesday, March 24, 2010

Magnolia Downunder Challenge #38 and Just Magnolia week 47 Challenge

Hello again, this is my second post for the day :o)
I have made an easel card to enter into both
"Magnolia Downunder Challenge #38"  and
"Just Magnolia week 47 challenge"

I started with the sketch that was required for this week's
Magnolia Downunder Challenge


This is the design that I came up with  for the front of the card...

 I then made it into an easel card to suit the "Just Magnolia" Challenge
Here it is open...

 ...and close up for detail.


Stamps        Bunny Tilda, Summer/fence backround, Hello Tilda
                   "Happy Easter" sentiment Daisy and Dandelion
Flowers       Cherry Blossoms - Magnolia Downunder store
                      Roses - Bizzy Becs       other - my scrap stash :)
Other           Bazzil cardstock, Airy Fairy Papers, Pink pearls
                     Ribbon, "wish" charm, green feathers.

Thanks for stopping by.
Happy Stamping :o)
Peta xx

Wednesday, March 17, 2010

Magnolia Downunder Challenge #37


This week the team at Magnolia Down Under are celebrating
their 1st Birthday and rather fittingly, this week's challenge is
to create a birthday card. The team are giving lots fantastic 
prizes, so why not "hop" on over and  take a look "here"

I have decided to make a card/box for the occasion...


I started with a trifold card, you can see how it opens out below

The inside of the card


and because this is a Birthday card, I wanted to make it special,
by making it into a giftbox, here is the side view of the box...


and with all the fantastic blog candy going around at
Magnolia Downunder  I just had to add "candy" to the box!

My 5 year old daughter already has dibs on this card/box for
her next birthday (she made me promise :oD) do you think it's
the card or the contents that she is REALLY after (lol), it's just
a shame that her birthday is not until December. Oh well, we
might have to refill it by then haha!

Stamps      Tilda with Balloons, 60's Tilda, Dragonfly Tilda, Sweet Tilda,
                    Butterfly Tilda and the 'make a wish' stamp was from spotlight.
Card/Paper    Regal Rose cardstock from Stampin up, Pink Bazill
                        and the paper is from "The Sweet stack"
Embellishments   Flowers were all from BizzyBecs, Ribbon, glitter,
                           'Happy' and 'Birthday' charms and rhinestone brads
                           are from my own scrap stash
                           Glossy accents on tilda's balloons.
     
Congratulations to everyone at Magnolia Downunder for an
awesome year, lets hope that there will be many more!
Thanks for the inspiration :oD


Wednesday, March 10, 2010

Magnolia Downunder Challenge #36

The recipe for this weeks challenge at Magnolia Downunder was to include
3 papers, 3 flowers, 2 buttons and a bow
and this is what I came up with


Stamps    'Honey Tilda' and Stampin Up  'Best Yet'
Cardstock      Stampin Up - 'Pumpkin Pie' and  'Summer Sun'
Papers      Stampin Up - 'Sweet Always'  DSP (all three)
Embellishments      The flowers, buttons, Rhinestone brad, glitter and
little Bee Charm were all in amongst my endless scrapbooking supplies. 
                                 

Tuesday, March 9, 2010

Sweet Treat Box with Card

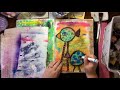
I made this sweet treat box
with Easter in mind, but you
can add whatever you like...
lollies, trinkets, small
scrapbooking supplies,
whatever suits your needs.


This is my first attempt at making a tutorial, so hopefully,
everything will be clear and easy to understand. There is
a place to make comments at the bottom of this post, so
feel free to add any if you think I could have done
something better or if you'd like to see something else.
Thanks.
P.S You may want to grab a cuppa, as this is a long post :o)


I started with 2 pieces of chipboard, measuring 13cm x 13cm
(I brought these in a pack of 10 from Kaszazz) but you can
just use hard cardboard cut to shape.
I have covered them using lightweight cardstock, but again,
you can use a matching paper or even just paint them to
match. The undersides will not be seen, so it doesn't have to
be really neat. You can put them aside, as they will be the
top and bottom of the box.

Now the drawers, you will need to make 4, they are made in
2 parts. Firstly you will need 4 pieces of matching cardstock
measuring 14cm x 14cm. Score and fold each of these on
both sides at 2cm,  8cm,  10cm,  12cm  they should look
like the first photo below. Next you will need to cut them
to look like the second image in the photo (the 3 squares
in each corner are cut away and a tab has been created)


Next you will ned to make them into little drawers by
folding and sticking or glueing the flaps as above in the
second photo. (I have tried to show show the 4 drawers
at each stage of making the box shape, as I thought
it may be easier than trying to explain in words).

Now we need to make the second part of the drawers,
You will need 4 pieces of matching cardstock
measuring 6.2cm x 18.7cm (odd measurement, I know,
but this allows enough space to house the inside of
the drawer). You will need to score and fold them at
2.1cm,  8.3cm,  10.4cm, 16.6cm,  and you are left with 
a 2.1cm flap.

 Stick or glue the
 flap to the other
 side to make the
 outside piece of
 the drawer (again,
 I have tried to use
 the photo to explain),
 and then slide the
 drawer into the outer
                                                        sleeve. When you are
                                                        finished, it  should
                                                      resemble a matchbox.


Now, take the top and botom pieces that we made earlier
and arrange the closed drawers onto one piece, making
the bottom. Make sure that the drawers open out in
different directions as below. Apply glue or strong
sticky strip to the top and bottom sides of the drawers
You may find it easier to remove the inside drawer for
this step) and sandwich the drawers between the top
and bottom layers, taking care not to squash the drawers
and check that the covered section of top and bottom are
 facing outward (so no chipboard can be seen).


It should look something like this, with/without the drawers.
 

I have decorated the front section of the drawers with
patterened papers and used rhinestone brads as handles
to make opening the drawer easier. You acn buy fancy
handles/knobs at most scrapbook shops, but Brads
make a cheap alternative and the size suited this
project rather well.

I have added a card that I made earlier to match this
box. I used double sided tape to adhere the entire back
of the card to the top of the box as in the photo below.
 I have then added my treats... in this case,
little easter eggs.


If you like, you can further decorate the box and inside
the card as I have done with this one.I have also added
a ribbon so that the card can be tied closed.
I hope you have lots fun with it.


Happy Stamping!

Brieana's First Magnolia card

I have a beautiful 5 year old daughter who shares my passion for
cardmaking and papercrafts. She was very excited to see some of
mummy's cards on the computer and she asked me if she could have
one of her cards published on here too. So I thought 'Why not'. Here
is her creation, with Tilda sporting gorgeous pink hair :oD

Sunday, March 7, 2010

Magnolia Card Swap

I recently took part in a card swap with other Magnolia fans around the
world. I was able to send cards to 2 ladies in the UK
This was the first one, which was also my first attempt at an easlel card.


I decided to make another Easel card for the second lady,
these cards are so much fun and so easy to make.
I also wanted to challenge myself by making a card that
was red/orange, as I usually play it safe with pinks and
purples. This what I came up with.


Friday, March 5, 2010

Magnolia Downunder Challenge #35

I wanted to make something special for this easter challenge, and decided that because I do not have any Magnolia Easter stamps yet, then it will have to have chocolate.
I have seen a few projects around on other blogs, that have drawers to store items in, so I have used that idea to create this little easter treat box.


Here is a pic of the top of the box. I have actually made a card and glued it onto the box and ties off to the side.

This is the inside of the card, I have used a cute little Easter bunny stamp from Daisy & Dandelion and added a little easter bunny poem.
The opposite site is stamped with Butterfly Tilda and I have left the surrounding space blank to add a personal easter message later.